Touch Typing and Finger Assignment
What touch typing is
Touch typing is the ability to type without looking at the keyboard and without consciously thinking about which finger to move. It relies on muscle memory: each finger is assigned a specific set of keys, and with practice the correct finger fires automatically when the brain wants a particular letter.
This matters for alternative keyboard layouts because every layout is designed assuming a specific finger-to-key assignment. If you do not follow that assignment, you lose the ergonomic and efficiency gains the layout was designed to provide. For someone coming from self-taught “hunt and peck” or hybrid typing, learning an alternative layout is an ideal opportunity to develop proper touch typing at the same time.
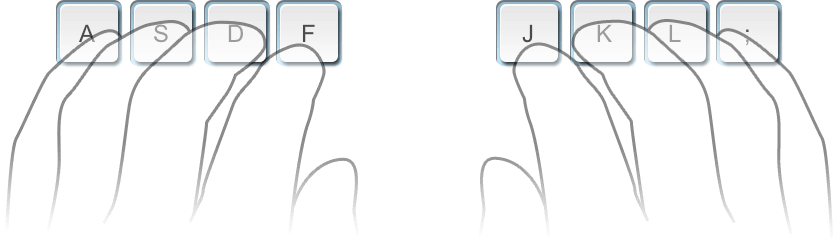
The home row
The home row is the row of eight keys where your fingers rest when you are not actively pressing anything. On a traditional QWERTY keyboard these are A S D F for the left hand and J K L ; for the right hand. The F and J keys have small tactile bumps so you can find the home row without looking.
Home row on alternative layouts
When people say “home row”, they mean the physical position — the middle row of letter keys. The actual letters on those keys depend on which layout you use. Any modern alternative layout places the most common letters on the home row, which is one of the primary improvements over QWERTY.
Learning the home row first is the standard advice because every other key is learned relative to it. You develop a spatial map: “E is one row up from my left middle finger’s resting position.”
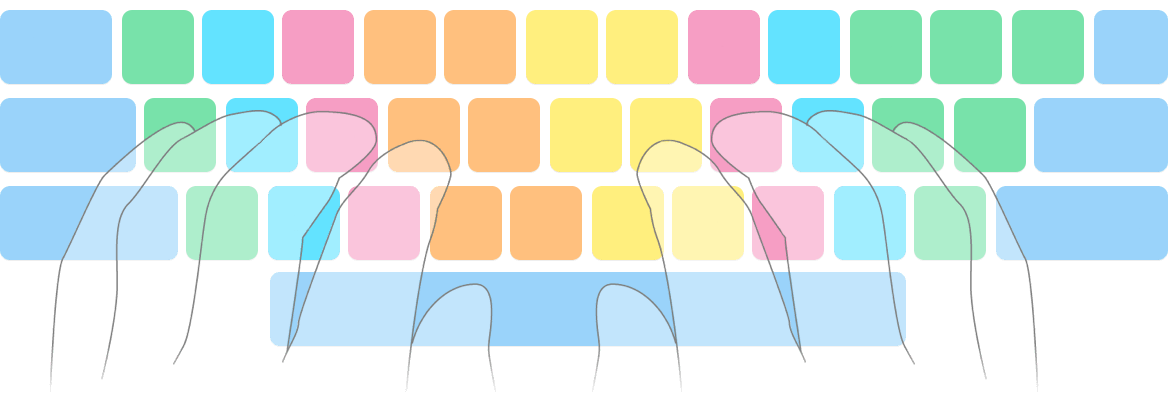
Standard finger assignment
In the standard model, eight fingers (excluding thumbs) cover the entire letter area. Each finger “owns” a vertical column of keys:
| Finger | Left hand column (QWERTY) | Right hand column (QWERTY) |
|---|---|---|
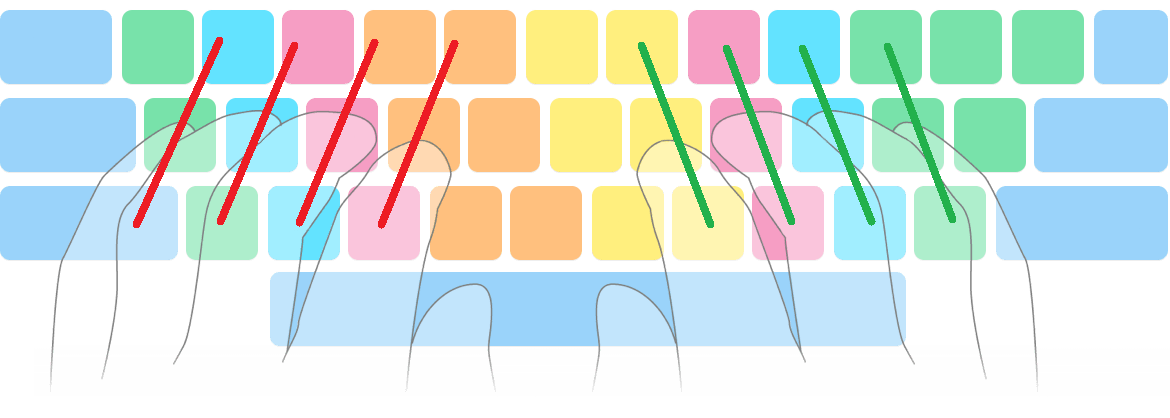
| Pinky | Q A Z | P ; / |
| Ring | W S X | O L . |
| Middle | E D C | I K , |
| Index | R F V + T G B | U J M + Y H N |
The index fingers each cover two columns (their home column plus the inner column toward the centre of the keyboard). Thumbs handle the space bar.
Column stagger vs columnar (matrix) keyboards
The problem with traditional keyboards
Traditional keyboards do not arrange their rows in a straight grid. Each row is offset horizontally from the one above it — a design inherited from mechanical typewriters, where the offset prevented the typebars (the metal arms carrying each letter stamp) from jamming into one another. This horizontal offset is called row stagger (to stagger means to arrange things in a zigzag or offset pattern rather than aligning them straight, like staggered seating in a theatre where each row is shifted so people can see past the heads in front).
Row stagger means that when your finger moves straight up or down, it does not land on the key directly above or below its home position. Instead, it lands slightly to the side. On a standard keyboard, the top row is offset 0.25U to the left of the home row, and the bottom row is offset 0.5U to the right (where 1U is one key width). The mismatch is especially bad on the left hand: the bottom-row keys are shifted to the right relative to the home row, so the left fingers have to reach diagonally rather than straight down.
Columnar (matrix) keyboards
Columnar keyboards — also called matrix or ortholinear keyboards — eliminate row stagger entirely. Keys are arranged in a strict vertical grid so that each finger moves straight up and straight down within its column. Split columnar boards like the ZSA Voyager go a step further: each half can be positioned independently, allowing your wrists to stay straight rather than angling inward.
If you use a ZSA Voyager or similar columnar split keyboard
Column stagger problems do not apply to you. Your columns are already aligned, so techniques like Angle Mod (which exist to compensate for row stagger) are unnecessary. When reading layout discussions online, keep this distinction in mind — much of the advice assumes a traditional staggered keyboard.
The trade-off is that columnar keyboards require retraining your muscle memory, since the physical positions of keys differ from what traditional keyboards taught your fingers. For someone already learning a new layout, though, this is not an additional cost — you are rebuilding muscle memory either way.
Top and bottom row reach
After the home row, the next layer to learn is the top row (one row above home) and then the bottom row (one row below home). On traditional staggered keyboards, the top row is generally easier to reach than the bottom row because fingers curl upward more naturally than they stretch downward. On columnar keyboards this asymmetry is reduced but not eliminated, since finger anatomy still favours upward curling slightly.
How to learn a new layout
The source document recommends a progressive approach using a word filter on typing practice sites like MonkeyType:
Step 1 — Home row only
Configure MonkeyType’s word filter to include only the eight letters on your layout’s home row and exclude everything else. Select a larger word set (English 1k or 5k rather than the default 200 words) to get meaningful practice. This generates typing tests using only real English words that can be spelled with home row letters.
Step 2 — Add rows progressively
Once you are comfortable with the home row, move letters from the “exclude” box to the “include” box a few at a time. A typical progression:
- Home row letters only
- Add top row letters
- Add bottom row letters
- All letters
How many intermediate steps you use is a personal preference. Some people add one row at a time; others add a few letters per session.
Step 3 — Full word tests
Once all letters are learned, switch from the word filter to MonkeyType’s standard time or words mode. Use an expanded word set (English 1k or larger) rather than the default 200, which is only useful for speed benchmarking.
Step 4 — Punctuation and shift
Enable the punctuation option to practice commas, periods, apostrophes, colons, semicolons, hyphens, slashes, question marks, exclamation points, quotation marks, and parentheses. This also forces you to practice the Shift key.
Correct shift technique
Use the Shift key on the opposite hand from the letter you want to capitalise. If the letter is on the left hand, press right Shift (and vice versa). Using same-side Shift forces your fingers apart uncomfortably — try holding right Shift and pressing Y on QWERTY to feel why.
Step 5 — Full sentences
Switch to MonkeyType’s quote mode to practice complete sentences with natural capitalisation and punctuation. You can filter by quote length or paste your own text.
Source
Derived from chapters 1.1 through 1.8 of Keyboard Layouts Doc (3rd Edition).